

I have been teaching myself some soldering over the last year, to make and augment some musical instruments, and some other, more strange projects. My biggest project by far was this; building a dub siren from scratch. Here I have documented my process and made a guide for anyone who dares to follow in my footsteps.
This dub siren is far from the most simple design. If you want an easy way out, you can find an old birthday card that plays a song or one of those “Mr T in your pocket” gizmos, and just poke’em with a soldering iron and you’re done(like this one). When I started out this project I had no soldering skills at all, but I had some time on my hands and thus I managed to teach myself the basics in a couple of weeks. It was my Christmas holiday, okay? You make it sound like I was unemployed or something.See the full rubdown after the jump.
Breaking news! If you don’t really want your hands wet with all the soldering and hard work, Korg is now releasing their Monotron synth, which does much the same thing as my dub siren, and for the truly nice price of around $85. Product details here. But you don’t want that of course, no, you want to work hard, making your own from scratch! Right? Then read on.
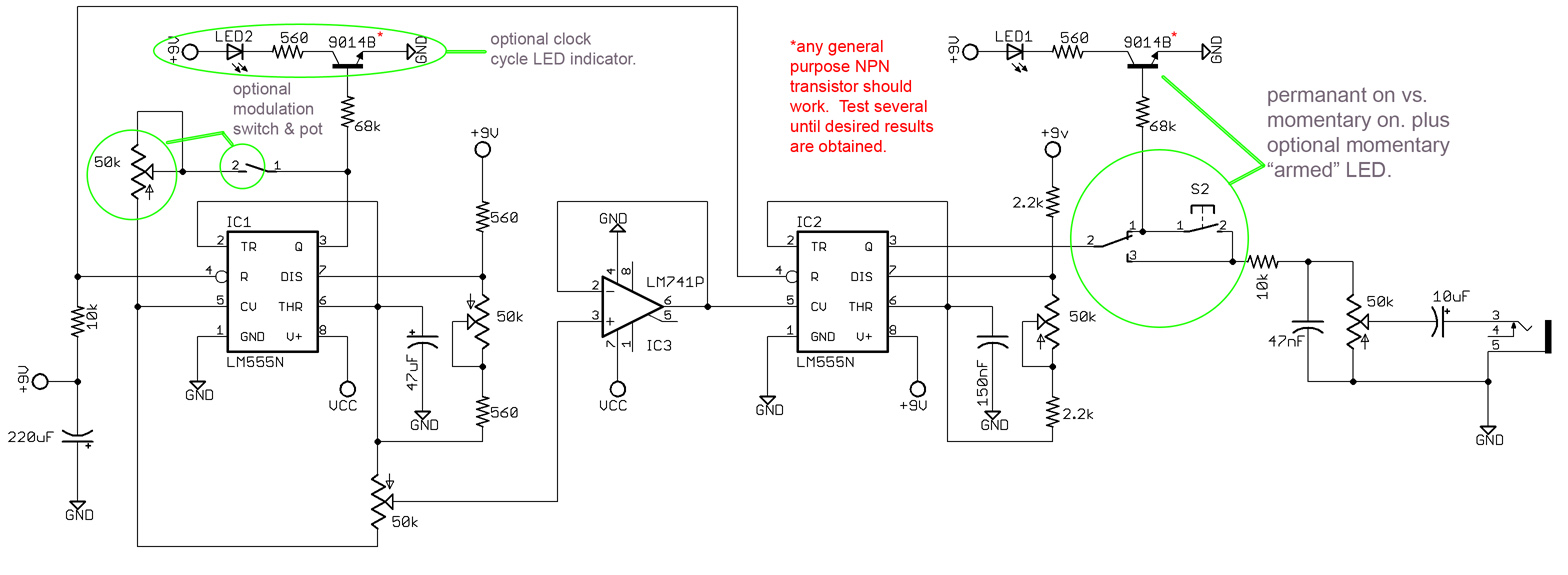
The Dub siren is based around two 555-chips generating the sound. It has buttons for volume, modulation, waveform, phase and frequency. It has a momentary on-button, and also a switch for a «hold» mode. An LED blinks at the waveform rate, and another one to indicate that the hold mode is activated (I skipped that one in my build). Check out the video and schematics at the bottom to see and hear.
Parts needed
IC’s
- LM555n × 2 – I used these, but most 555s will probably do.
- LM741 × 1 – operational amplifier
Pots:
- 50K × 5
Buttons etc.
- off(on) push button × 1 – the momentary on button
- on(on) toggle switch × 1 – permanent on/«hold» switch
- off(on) toggle switch × 2 – modulation on/off switch & power on/off
- LED × 1 – 3mm or 5mm, I used a fiver.
- Either a 9V battery (which will be spent crazy fast), or a 9V wall wart transformer, and a DC socket to plug it in.
- a big TRS socket for the output. You know, like a guitar plug.
- LED holders (for extra finesse and glam)
- IC holders to protect your ICs from overheating when you are soldering. Especially important if your soldering skills are not the best.
- Knobs for the potentiometers
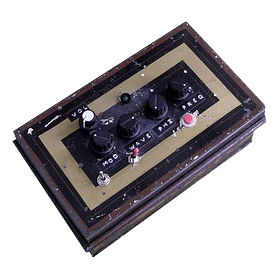
- Some cool casing. I used an old barbers box I found at a flea market.
Capacitors:
- 47μF × 1
- 47nF × 1
- 22μF × 1
- 150nF × 1
- 10μF × 1
Miscellaneous:
- A bunch of resistors. Just buy a packet that has all kinds.
- 2 General purpose NPN transistors (see the circuit diagram below)
If you are Scandinavian and don’t have a store in town that carries the parts, have a look at electrokit.se, where I got (almost) all my parts. Pretty cheap. I later found out Elfa seems to be the industry standard supplier. My experience tells me that buying this stuff online is way cheaper than in a store. And it’s light, so postage is practically free. My 555s I had to order from the UK (totalrobots), so I bought 20 so I’ll never run out.
More things to think about
I actually made this siren twice, the first time around I basically had no idea what I was doing, with the result that if I opened the lid of the siren, or just shook it a little, it would change the sound, or most times just stop working. Hopefully not at a gig. So what to do? Build the whole thing back up from scratch of course!
The second time around I was able to take benefit from everything I had learned from my mistakes. For example, the first version used solid core wiring. Kids, stay away from that stuff! It just breaks all the time. I used it because I was so tired of stripping cables with scissors. Instead, use multi-core wiring and just invest in cable stripper pliers, they are quite cheap.
Secondly, try to make the entire thing on one board, putting all the components as close together as you can. This way you have a way more stable end product, that will not break if you just look at it angrily, like my first one did. As a bonus this makes the whole thing take up less space, enabling you to use a smaller casing. I actually overshot it a bit with my casing, I could easily have gotten away with using something half its size. My tip on this is to wait to decide what to use until after you finished soldering, so you know how much space you need.
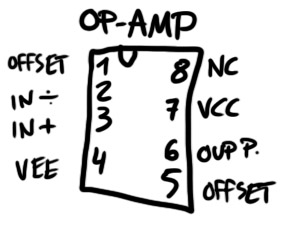
Another thing you need to know about the schematic is; Dave made the IC’s a little confusing. The connection on the top left of your IC does not necessarily correspond with the one on the schematic. I found out what connections are where on the ICs I used (see the pictures above the video). If you use different model IC’s than me you might want to google the model number and go through some PDFs to find it. If you are in doubt, use my drawings to guide you through it.
Another thing is, your line output is going to be huge on this thing. So right before the last output (on the + wire of course), put a resistor, just experiment with different ohms. If not, you might come with the siren to a party, and when some drunken fool rambles up on stage to mash your buttons, he turns the volume all the way up and blows every fuse from here to Calcutta.
According to feedback in the comments, you should tie the 22μF smoothing cap’s negative leg to ground. That way you won’t risk blowing it.
You can nick the original schematic from dave on flickr too. Just keep in mind the alterations I mentioned. If you need to learn how to solder, this article is a good primer.
The schematic is at the bottom of the post, alongside some pictures. Just download that, and see if you can make sense of it. Good luck!
-
- the main circuit
-
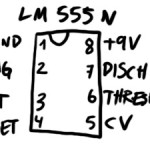
- the 555 I used
-
- inside the box (a mess)
-

- tadaa
-
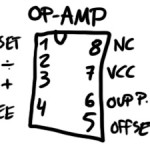
- the op-amp I used
that’s about all I can gather from the schematic. Hope I didn’t forget anything. Just holler in the comments if you have questions, or, you know, comments.
UPDATE: This article has gotten a lot of great comments, so I highly recommend reading through them all, as many of them may answer your own questions.
And if you liked this article, how about showing some love on Facebook? If you “like” my page, I’ll let you know about new projects and things you might like. If you are hard-core (as I know you are), you should enlist for my newsletter! mail-outs are fun, rare and full of free stuff.
[et_bloom_inline optin_id=”optin_4″]


I would actually advise anyone interested in electronics to study the amazing circuit of the 555, internally, if you havent, and how it works… So simple and so mad !!
Ok the led seems to be lighting when Q is low, therefore using the ground state of the pin ?!?!
reset input (pin 4) is floating, so only the voltage reference coming in and therefore inactive, . Under these conditions, the output (pin 3) is at ground and the discharge transistor (pin 7) is turned on, thus grounding whatever is connected to this pin.
Its grounding it, but in a very funny way…
I wonder whats happening while its on high, though as its the output pin of the 555… ?!?
* And hope my attempts at being funny didnt came out wrong… Only noticed it after posted …lol As, i said, all in jest ! The barriers of the virtual world, i guess !
the cicruit had many problems …not only the output level
changes:
1-The most important change is the NO switch to ground !
2-protection diod (it’s better to use it)
3- 130 k resistor in output
I didn’t discover anything … what’s the problem ? Anyone can build his own siren using less components , easier schematics , obtaining exactly the same result ( better cause there’re not interferences when not armed), less time for building , less possible errors , even a begginer can build it now easily.
I don’t inderstand your sarcasm and disappiontment .
Try my schematics .
You’ll understand where ‘s the hidden ground for the led …
Yeah, Just learned a new term for what that pin can do ( both sink and source current) :It has a “totem pole” configuration . Pin 3i mean. As i said, amazing circuit !!
I knew where the ground was coming… I assumed straight by the low level of the pin, which we confirmed can both source ( on high) or sink… I just made an observation to what the rules of good design of the chip say… The rest i was just trying to understand what you had done. Whats wrong with it ?! I love to understand what is happening in the circuit, dont you ?!
And… There was no disappointment here, mate !!
I actually tried to say i was just lightening the mood. But if you thought otherwise, fair play !
//www.ti.com/lit/ds/symlink/lm555.pdf
What power rating pots is everybody using? Got a fantastic sounding finished siren using 1w rated potentiometers and a few friends have asked me to build them one, however to them spending 6 pounds on each pot is a little excessive to them, would this still work well with 0.5w or 0.25w pots?
Another thing that is confusing me is when I try to work out the frequency output of the second 555 on paper. For the maximum and minimum resistance value on the pot i calculated that the output would never be about about 1.5khz, yet the output signal sounds much closer to 15kHz (going to actually check it on an oscilloscope later today). Would this be because of the connection of the other timer through the control voltage pin? I’m unsure if this would increase the frequency of the output.
1/4 W is enough for the pots, they cost about 1 -1.50 euro each .
Do you want to decrease or increase the oscillation frequency or the pitch ?
I had a dive in some books today and worked it out. I didn’t want to change anything I just wanted to understand how the VCO can produce frequencies above the 1.5k calculated from the standard equation of 1.44/(r1+2r2)c, which I now know is due to the effects of the LFO being fed into the control voltage pin.
As for the pots, I checked the current drawn from my battery today and found it pulled 0.07a, which at 9v would mean the circuit is at a 0.63W power rating, so I think I’ll stick to using 1w rated pots to give it some headroom, for the purpose of this I dont mind spending an extra 15 quid for added peace of mind.
“As for the pots, I checked the current drawn from my battery today and found it pulled 0.07a, which at 9v would mean the circuit is at a 0.63W power rating”
this is not correct 🙂 you are ok with 1/4 W , believe me 🙂
The power in watts dissipated by a resistor with the value R will be the square of the voltage drop across it divided by its resistance P=V^2/R .
this means that if R is 50000 (50k) it’s impossible for you to reach a power 1/4 W in this case
for exemple:
9V : P=9^2/50000=0,00162 W
100v : P=100^2/50000=0,2 W
Bult this circuit a few times in the past, from strip board, veroboard, and proper PCB designed by me ! Always used 0.2W, but tried 0.5… It will get on with it quite well with 1/4 . Did you tied the pins 4 yet ?! Nice to see the work you already done with sorting the maths of the circuit and rest !! The original circuit, as it was, for begginers was nice ! Of course there are many ways to do a nice VCO with an LFO ( currently doing DFT to generate some oscillators, kinda Digi synth). You could also look into one using the built in VCo of the 4046 with a 555 to feed it !! 2 chips circuit nice siren ( Diff type of sound, as it is more up ramps, apart from the point where the siren goes on).
Maybe we should do a page with different types of sirens, JACOB ?! I already finished two on AVR and Arduino, which i can share, code, schematic, etc… And other analog variants as well !
DUB SIRENS i meant !! lol
Good idea BS, I’ll think about branching out the page so we can see more variations. Great conversation guys!
@CAL : Try this to calculate it… best simulator i seen online for quick solutions
//www.falstad.com/circuit/e-555square.html
By the way on the original design, to bring down the output , all you have to do is a voltage divider with two resistors (//en.wikipedia.org/wiki/Voltage_divider), before the decoupling of the signal( r+c section), where you used the pull down ~ you should have used a resistor with it, by the way)
If you measure the output you can maybe halve it, and/or use this calculator //www.raltron.com/cust/tools/voltage_divider.asp
This in laymen terms…
//dubworks.blogspot.co.uk/ to some of my documenting works… Also if anyone wants PCB’s of the dubsiren you can shout and im sure i can sort it cheap !!
My digital model has LCD, and several patterns as well… New one im working on will be a mix of dubsiren and drum synth, with echo, reverb, etc as optional… All through DSP. Other previous models include a mix of digital and analogue !
Arduino Language is quite an easy one to learn, if u have no background, though its quite limiting for proper fast stuff like audio related…
Some options and ideas, anyway, for those interested !
This is one of mine //www.youtube.com/watch?v=wia98iS0llM , it’s my favourite prototype , I can ‘t stop playing with it . I don’t use arduino , I’m old school 🙂
Yeah, for sirens i try to do a mix of digital controlling it but with ultimately an analogue VCO… But as i can, i love to play around with Sound synthesis… Why not ?! I mentioned Arduino as they can give you some basic stuff for learners… You cant go far on it. As for other MCU’s i use, you can get them at 80Mhz or more, nowadays, for less than the analogue counterparts.
You an even add them delay, and other effects all in one chip !~ Hence my side interest on it !
But the video above is all analogue !!..
I was investigating the origin of the interferences when the siren is not armed and I found another interesting and easier solution to obtain complete silence when the siren is not activated .
Interference came from the second 555 , so no current no problems 🙂 it works perfectly .
//img27.imageshack.us/img27/1899/modifiedsirengood.png
Also a normally closed button to ground in signal works in reducing interferferences but not at 100% , you can still hear a little bit …
Hi!! I have tryed to do your dub siren but I cant…. I see a lot of plans to make it, and i dont know very well which is the correct. so Please, Could you post or send me the correct and definitive plan? Now I am doing your dub siren in a breadboard and i have some interferences and the output level is very poor too… Thanks so much for your support!! Regards
Use this , it works perfectly . If you want more output level you can change the 130k resistor ( from 10k to 130k in this range ) . If you have problems write here or reppaudio@gmail.com
//img27.imageshack.us/img27/1899/modifiedsirengood.png
Use this . It works perfectly . If you have problems write here or reppaudio@gmail.com
//img27.imageshack.us/img27/1899/modifiedsirengood.png
Hi guys, thanks a lot for the great contribution.
I just finished my first prototype of the siren…cased in an old vhs cover…looks great.
I used the last modified version suggested from Reppa…and was just enjoying and playing along some good roots reggae. 🙂
It all went good….the only think I notice is a bit of hum….running around while not playing the siren…could it be a mistake of mine?
Or is it just like this?
Oh, and another think…led not blinking at all! Less important for me 🙂
Great work again.
Blessed Love
Hum “usually” means a thing : a bad cheap power source . Try using a 9v battery , if Hum disappears you know you have to buy a better power source . 9v or 12v are both ok .
@rasta3:
about the led :
-broken led
-reverse led polarity ( I think this is your problem)
@rasta3
I suggest not to use a plastic enclosure like an old vhs cover .
All the pots metal enclosures should be connected to eachother and connected to ground . So if you use a metal box it’s easier cause the ground from the power source through the metal enclosure goes to the pots and to the out jack . This is very important for shilding interferences .
Alternatively you can glue internally in the pastic enclosure an alluminum foil .
@rasta3
like in this picture:
//imageshack.us/a/img716/5641/enclosure.png
Don’t use isolated plastic jacks or ground will not touch the inner alluminum foil .
@rasta3
Important: Power source connector must have positive in the center and ground in the ring . Pay attention cause there are 2 types of connectors, don’t use the type with positive in the outern ring .
That chematic has been assassinated… Who leaves the reset floating? Guessing in electronics is dangerous… When you dont know, you should research first …
Dangerous ??? You need to explain why it’s dangerous and under wich conditions before to state things like that .
you can leave pin 4 floating . Usually it’s better to connect it they say , but in this case is not strictly necessary . I built many oscillators using ne555 , stray pulses have never been a problem . Many friends of mine are using my sirens in dub sessions and me too I played a lot with sirens . If you don’t trust me you can connect pin 4 to vcc , as written in datasheet , I did research about that , and also I tried many circuits . You can say that if you want to avoid the effect of possible strain pulses on 555 you should connect pin 4 to vcc , but in my experience it never happened in this particular use of the 555. If you don’t connect it is NOT DANGEROUS , it only could happend that the 555 may reset by himself under determinate conditions . I want to clear up that the 555 won’t become a Bomb 🙂 . If you think I’m wrong please demonstrate it. Replicate a circuit and make it blow up, make a movie possibly , cause I tried many times and I didn’t succed . People are still using my sirens (they are still alive). You didn’t even know that an IC can sink and source and now you believe you are a masterchef … come on .
Here is a very clear layout and PCB . free
//imageshack.us/photo/my-images/855/tthq.jpg/
there’s also the optional modulation pot .
If you have problems or suggestion : reppaudio@gmail.com
Use a shilded boxe to avoid hum and interferences
A comment about Floating Signals.
Best to never leave pins floating that are directly involved with circuitry of a working component, such as resets of a logic gate or op-amp. Most the time they are voltage operated, and depending on the trigger level of the reset/enable pins a couple of .1 V differential between case/Gnd level can cause A chip to reset or even worse not enable. In theory, always best to tie them to appropriate high/low logic levels.
On the PCB layout:
If making PCB layouts, try to avoid 90 degree bends, and always aim for 135° bends. Having sharp bends in signals such as 45/90 degree can lead to reflections of signals which in turn can lead to signal degradation and loss. However, it should be noted that this mainly occurs with higher frequency signals that human hearing. It is though a good practice.
These comments are more of guidelines for this project, but in many applications are necessary including rf circuitry and very low power control systems.
I agree with the general guidelines . But in science “it’s better to ” is a little suspected 🙂
I asked myself why it’s better ? Under wich conditions ? Are these the conditions in this circuit?
If it’s better what happends if I leave them floating ? Then I tried …I took measures under different conditions (temperature , voltages , reset , proximty to magnetic fields ) and nothing happened (I tested NE555).
Anyway these general guidelines can be usefull in other applications. But in this I found out it’s not necessary .
As you pointed out also the layout in this application could be different 🙂 but when ? Is this the case ? Obvioiusly no . But in general , for other specific applications I totally agree .
I made it very fast , I didn’t use the proper software , but it works , if you want to improve it you are free . This was just an easy solution . I made also other layouts that you would like best 🙂 but this is free and to me it sounds the same as those with all the criteria respected
I agree Reppa. For this project, almost anything will do.
Hi Guys,
I’ve built this circuit however when using a push-to-make to trigger the +V of the second 555 timer, although the ‘bleed’ problem is solved, when armed I am hearing a click on the output, presumably from the first IC switching from high to low. Anyone experienced this or have a solution?
@Dudana : That click is proportional to the pitch . Reduce the pitch turnin the pot , you should hear it only when the pot is almost at maximum position . Or you can change the resistor (2.2 k) until you find the right value (until you cant hear it anymore) reducing the higher frequency. Instead if you set higher frequencies by changing the resistor , you’ll not hear a clear passage but only clicks . Try to change one of the 2.2k , try different values (1k-2k-3k-4k) until clicks disappear. This is the easiest solution .
Built this a while ago.. thanks to Jacob for the original post! 🙂
Just wanted to post some test voltages here in the comments which helped me for troubleshooting. These are from a pspice simulation. On working breadboard and stripboard circuits I found IC2 was a bit higher around 4.5V, IC3 pin 3 around 4V, and pin 7 around 3.5V.
IC 1 is the 555 on the left in the schematic, IC2 is the 741 and IC3 is the second 555.
Test Node Voltage (V)
VCC 9.00
C2 (47uF) 5.14
IC1 pin 35.88 mV
IC1 pin 7 1.25
IC1 pin 2 2.56
IC2 pin 3 3.85
IC2 pin 6 3.85
IC3 pin 3 5.39
IC3 pin 7 1.92
C4 (47nF) 4.49
C5 (10uF) 2.24
Hwy guys,
i’ve been working on the siren for some time now and am really keen on getting it up and running.I am facing a problem on the output. The LEDs are working fine and blinking, however I am not getting any sound output. Can someone pls help me with the possible reason for it. I’ve gone through the comment and did not find any ref. to it.
Blessed thanks.
Maybe inverted 10uf capacitor at the output… Check it. Or some error on the last pot…
@Reppa
I am thinking about using your simplified schematic but would like to also include the modulation pot. I am a total beginner and am unsure of how to do this myself. would it work by simply putting a switch and pot in the leg from 3 on the first 555 to the power supply? or do i need to branch between this leg and leg 5 for the swith and pot?
Thanks
I removed the modulation pot , i don’t like it , nothing special . Make it easy than you can add mods later . If you are a beginner Less components you use , less possibile errors , this is my philosophy 🙂
(a pot means 3 flying wires soldered , a source of sure error for a beginner) .
Thanks ill start off simple then. how do you know which side of the pot is which?
//www.google.it/imgres?imgurl=//www.diystompboxes.com/pedals/pot.GIF&imgrefurl=//www.diystompboxes.com/wiki/index.php?title%3DFrequently_Asked_Questions_(DIY_FAQ)&h=106&w=237&tbnid=69TCfcJrM1nZmM:&zoom=1&docid=ie7Vcxk5PHh43M&hl=it&ei=IjjZU6SMGo_24QSj-IGgDg&tbm=isch&ved=0CFYQMygvMC8
awesome thanks. When buying my 9V power supply converter, what sort of output current am i looking for?
500 mA is enough . If you use the protection diod is better to use a 12 V power supply. Buy a switching power supply with variable voltage , so you can switch to the desired voltage